I believe I always wanted to build something with lasers, mainly because lasers are cool. It's like playing with fire: it's dangerous, but fun. As a kid, I had a stamp collection and won a magnifying glass to see and analyze my stamps. I think I only used it for putting things on fire.
F ew days ago I saw some cool projects (this one uses laser to put things on fire as well) using lasers and I got tempted to do something as well, since I already had a red laser diode in hands. When I realized how the laser Spirograph worked, I knew it would require very few components to build it and I also found the whole idea behind it very interesting (this illustration made by the Interactive Electronics Design is very explanatory). I'm not talking about the Spirograph itself, but the persistence of vision phenomenon, which allows us to draw things/lines/curves using a single dot of light and see it in a continuous form.
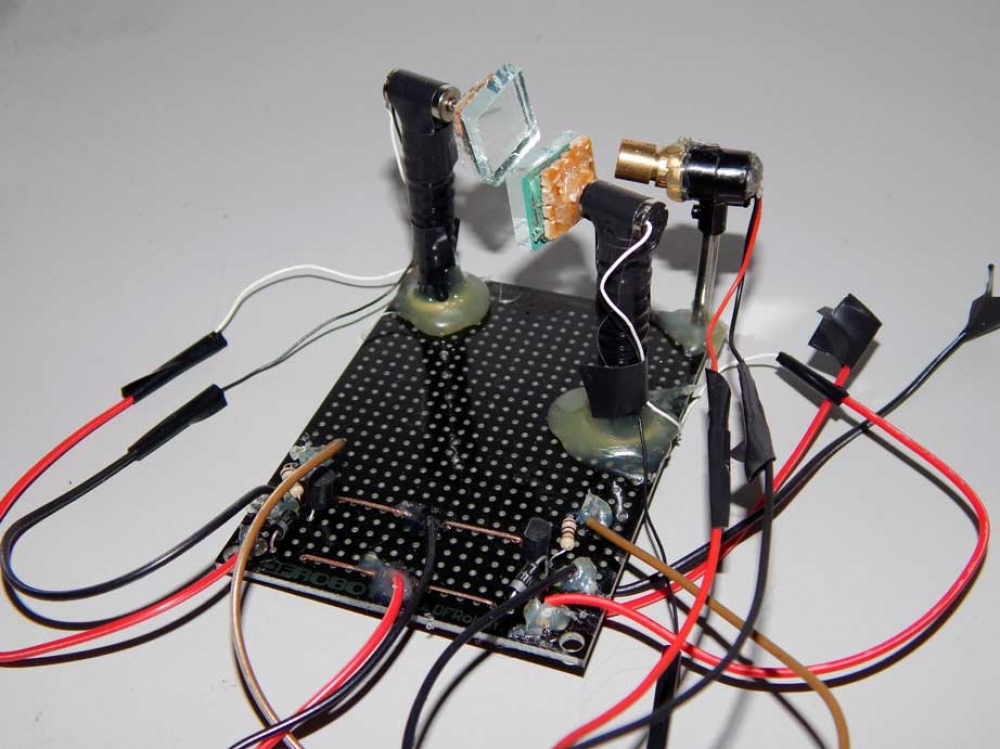
"The essence of the mini-laser Spirograph is two mirrors attached to small dc motors. A laser beam striking the rotating mirrors will produce a wide array of patterns. With one mirror rotating, the reflected beam “paints” an ellipse on a screen. When both mirrors are spinning, two elliptical patterns superimpose to produce more complex shapes. The pattern observed depends on the ratio of the speeds and direction of rotation of the mirrors." - as well stated by Chris Chiaverina here.
A friend of mine gave me a broken remote-controlled helicopter, from which I removed all (5!) DC motors (they are just like this). They don't have much torque, but they're very, very fast and very, very small.
People seem to always use potentiometers to control motor speed, but I wanted my Arduino to do all the job. So I started worrying about controlling a motor speed through the Arduino. I could had used a motor driver to do so, but I found an interesting article at Adafruit that described an inexpensive circuit to control it. So, following the tutorial, I built the circuit, tested it and approved it. Then I transferred the circuit into a PCB protoboard, duplicating it for controlling two motors instead.
I think the most difficult part of assembling the components was to adjust the mirrors in a way they would reflect the laser's projections properly. This was done using a trial and error approach. I used hot glue to fix cables and holders.
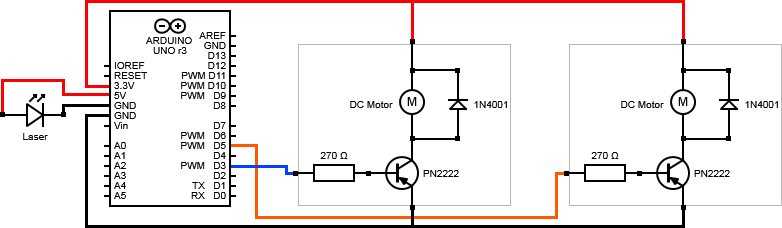
The schematic/wiring diagram is as shown below. Some people will notice upfront that the diagram is a little bit messed up. I was reluctant to publish a post with a "problematic" diagram, but since it is how it was truly done and I intent to improve it, I think it's okay. The problem is that, as I'm using the speed-controlling circuits in parallel under the same power supply (Arduino's 3.3V power pin), whenever I let too much current passes through one circuit, it drains out the current available to the other one, eventually collapsing Arduino, making it reboot. I know, terrible, but it can be easily fixed by adding a separated power supplier (probably I'll make another post whenever I get it done). After few tests I found out that, as far as I use speed values below 90 for both motors, it works fine the way it is now.
Demo video:
Be aware of the potential hazards when working with lasers. Read this.